Copper Pipe Diameters Explained for Canadian Plumbing
You're standing in a service corridor with a caliper, a submittal sheet, and a suite shutoff that won't match either one. The drawing says 3/4 inch, the tube in the wall measures larger than that, and the meter on the cart looks right until you try the fitting. That mismatch is normal in Canadian copper work, and it's exactly why Copper Pipe Diameters need more than a quick lookup chart.
Table of Contents
- Why Copper Pipe Diameters Are Harder Than They Look
- Nominal vs Actual Diameter in North American Copper
- Type K, L, and M Compared by Wall and Use
- DN, NPS, and Millimetre Conversions for Copper
- Sizing Copper for Branches and Suite Connections
- Why Bigger Is Not Always Safer in Copper
- Matching Copper to a Water Meter Body
- Quick Reference and Selection Workflow
- Cross-Reference Questions Readers Still Ask
Why Copper Pipe Diameters Are Harder Than They Look
A property manager in a 60 suite building points at a riser and asks a fair question. Will the new submeter fit that 3/4 inch copper? One installer says yes because the nominal sizes match. Another hesitates because he doesn't know the tube type, the adapter thread, or whether there's enough straight, supported length for the meter body.
Both reactions make sense. The nominal label only names the product family. It doesn't tell you the outside diameter, the inside diameter, or the wall thickness that determines flow area and durability.
Three Variables Hidden in One Label
Fittings care about outside diameter. Flow and velocity care about inside diameter. Pressure capability, corrosion allowance, and service life care about the wall between them.
Get the first wrong and the joint won't assemble cleanly. Get the second wrong and your velocity calculation is fiction. Get the third wrong and you've specified a tube that looks correct on the rack but behaves differently in the system.
On site rule: Never approve a meter, valve, or repair coupling from the nominal number alone. Confirm the tube standard and type stamped on the existing run first.
What a Complete Specification Looks Like
A defensible copper specification isn't "copper pipe." It's a four part string that a supplier, installer, and inspector can all read the same way.
- Nominal size: The familiar label, such as 1/2 inch or 3/4 inch
- Tube type: K, L, or M for water tube, or a different product for DWV, refrigeration, or medical gas
- Temper and form: Hard drawn straight lengths or soft coil, where that choice applies
- Applicable standard and joining method: The ASTM designation plus solder, press, or another approved joint
That string prevents the most common rework I see on metering retrofits. Crews order by nominal size, discover the existing tube is a different type than assumed, then lose a shutdown window to adapters that should've been in the original material list.
It also protects billing accuracy. A meter forced into a run with poor alignment, nearby turbulence, or an operating range that doesn't suit the branch won't give the property a trustworthy reading, even if the joint doesn't leak.
Keep the logic in order as you work. Identify the standard, confirm actual dimensions, compare wall types, convert the designation correctly, then size for demand and velocity before you select a meter.
Nominal vs Actual Diameter in North American Copper
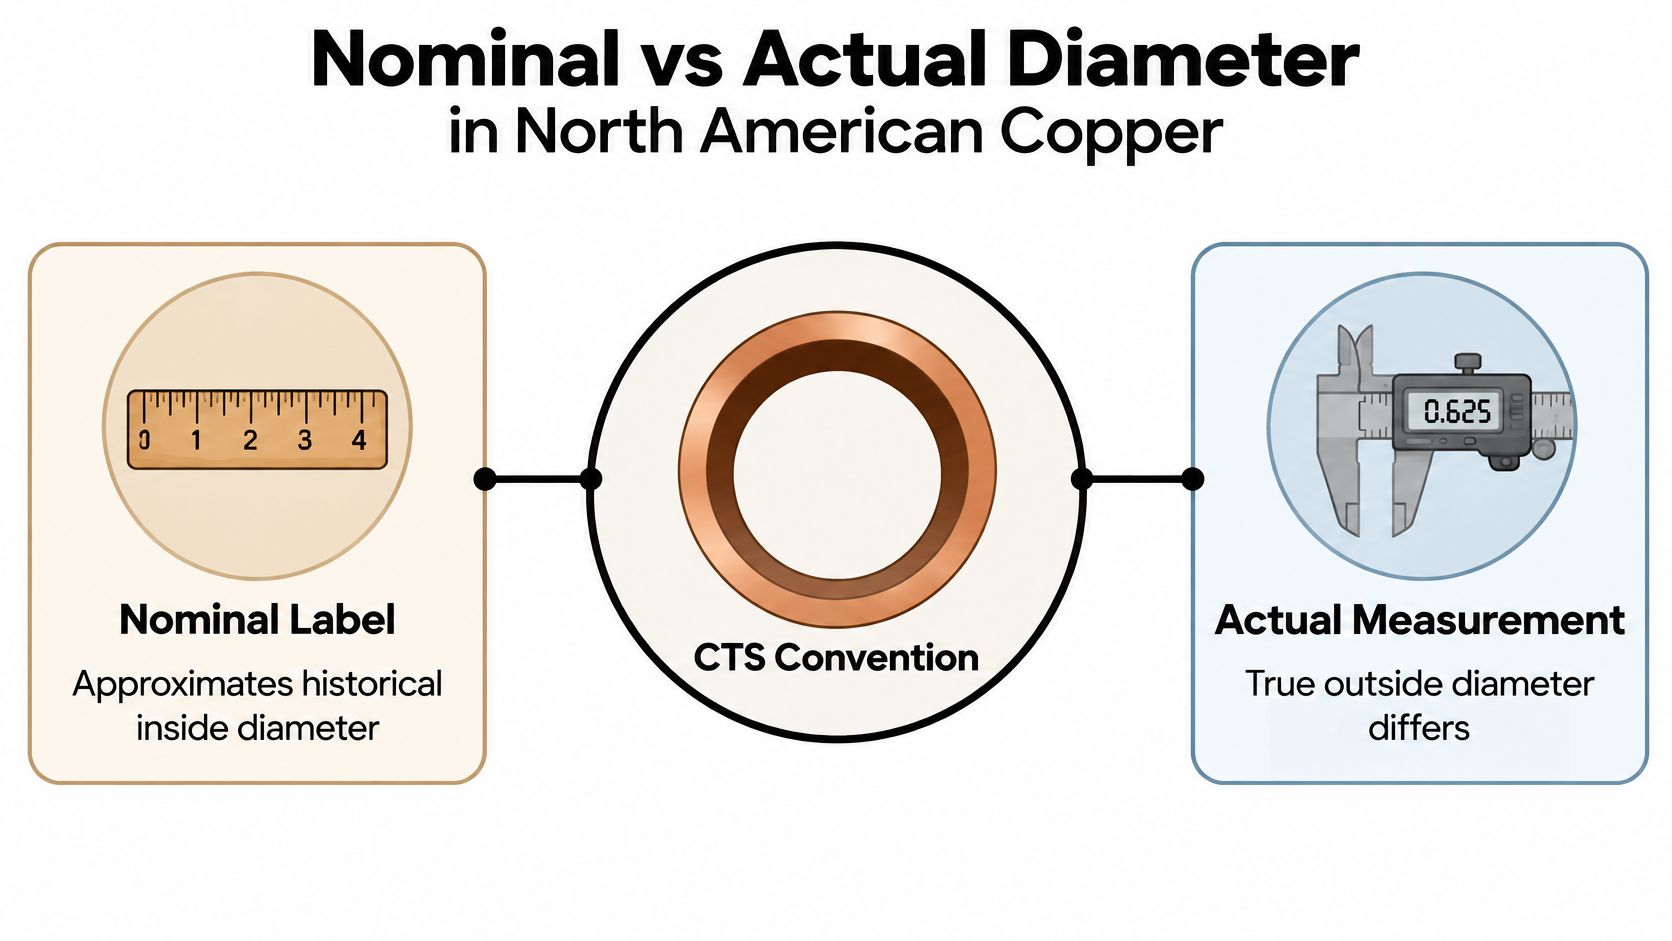
North American copper water tube uses the Copper Tube Size, or CTS, convention. The nominal label is a historical name, not a live measurement of the tube you're holding. That's why your tape and the printed size disagree without either one being wrong.
For CTS water tube, actual outside diameter is the stable dimension across Types K, L, and M at a given nominal size. Inside diameter changes because wall thickness changes. A thicker wall leaves a smaller bore inside the same outside envelope.
Why Your Measurement Looks Wrong
Measure the outside of a nominal 1/2 inch CTS tube and you'll get a larger number than the label. Measure a nominal 3/4 inch tube and the same pattern holds. The fitting socket is built for that actual outside diameter, while the box still carries the nominal name.
Don't order a fitting by the socket measurement. Fittings are named for the nominal tube they join. If you measure the socket and order that dimension as though it were nominal, you'll bring back a fitting one size too large.
Threaded ends add another trap. A copper fitting can have a CTS socket on one side and a threaded connection on the other, and those ends don't follow the same naming logic. Read each end on the submittal separately.
Tube Is Not Pipe, and Water Tube Is Not DWV
Canadian product identification is clearer when you name the standard. The Canadian reference for ASTM copper tube standards identifies ASTM B88 for Types K, L, and M water tube, ASTM B306 for DWV tube, ASTM B280 and B68 for refrigeration and air-conditioning tube, and ASTM B819 for medical-gas tube. Those standards set outside diameter, inside diameter, wall thickness, and tolerances for their products.
That distinction matters because true copper pipe under ASTM B42 doesn't share the CTS water tube dimensions, and DWV tube is a drainage product, not a pressure distribution substitute. Refrigeration tube follows its own sizing practice as well, so a water tube chart is the wrong tool for it.
The Canadian reference also covers an outside diameter range of approximately 0.2 to 4.25 inches for the defined copper tube products in the same source. Across a range that wide, "copper" by itself tells a buyer almost nothing.
Treat nominal as an index into a standard, not as a dimension. Once you've found the right row in the right standard, the outside diameter, bore, and wall stop being guesswork.
Type K, L, and M Compared by Wall and Use
At the same nominal size, Types K, L, and M share the same outside diameter. They don't share the same wall, bore, or service expectation. Type K has the thickest wall and smallest inside diameter. Type M has the thinnest wall and largest bore. Type L sits between them.
That sounds like a minor manufacturing detail until you price a riser replacement or try to hold velocity in a hot water recirculation branch. The bore you have, not the label on the bundle, sets flow area.
Nominal
OD (in)
Type K ID (in)
Type L ID (in)
Type M ID (in)
1/2 in
0.625
Smallest of the three
Mid bore
Largest of the three
3/4 in
0.875
Smallest of the three
Mid bore
Largest of the three
1 in
1.125
Smallest of the three
Mid bore
Largest of the three
1-1/4 in
1.375
Smallest of the three
Mid bore
Largest of the three
1-1/2 in
1.625
Smallest of the three
Mid bore
Largest of the three
2 in
2.125
Smallest of the three
Mid bore
Largest of the three
Use the manufacturer's ASTM B88 dimensional table for the exact bore on a priced job. The pattern that matters at the estimating desk is consistent. Stepping from M to K at the same nominal size buys wall, and it gives up internal area to get it.
Where Each Type Earns Its Place
Specifiers reach for Type K where mechanical exposure, burial, aggressive conditions, or a long service expectation justify the heavier wall. That extra material also provides more corrosion allowance, which is why K shows up in demanding service and vulnerable systems. The trade-off is cost, weight, and a reduced bore.
Type L is the workhorse for interior distribution, risers, and most metering tie-ins. For suite level water work, it's commonly treated as the standard default because it balances durability with a usable bore. If an existing building has no record drawings, L is often what the crew hopes to find, but hope isn't identification. Read the print line on the tube.
Type M is lighter and less costly, and it can be appropriate where the governing plumbing code, pressure, corrosion environment, and authority having jurisdiction permit it. Don't extend that permission by habit from one jurisdiction or application to another. A repair that casually substitutes M into an L system may fit the same fitting while reducing the wall the original designer counted on.
Older Canadian buildings can hold more than one piping era in the same shaft, including plastic systems that raise separate replacement questions. If a survey turns up grey plastic supply piping alongside copper, find poly B pipe information before you assume the whole branch should be treated as a like for like copper repair.
On a repair, match the existing type first. Same nominal, wrong type is still the wrong specification.
DN, NPS, and Millimetre Conversions for Copper
Submittal packages rarely speak one language. A Canadian drawing may show NPS, a valve sheet may show DN, and a European fitting catalogue may lead with millimetres. Those labels overlap, but they don't convert by simple arithmetic.
NPS is the nominal pipe size designation in inches. DN is a nominal diameter designation in millimetres. Neither one is a promise that you'll measure that exact number on the outside of a CTS copper tube.
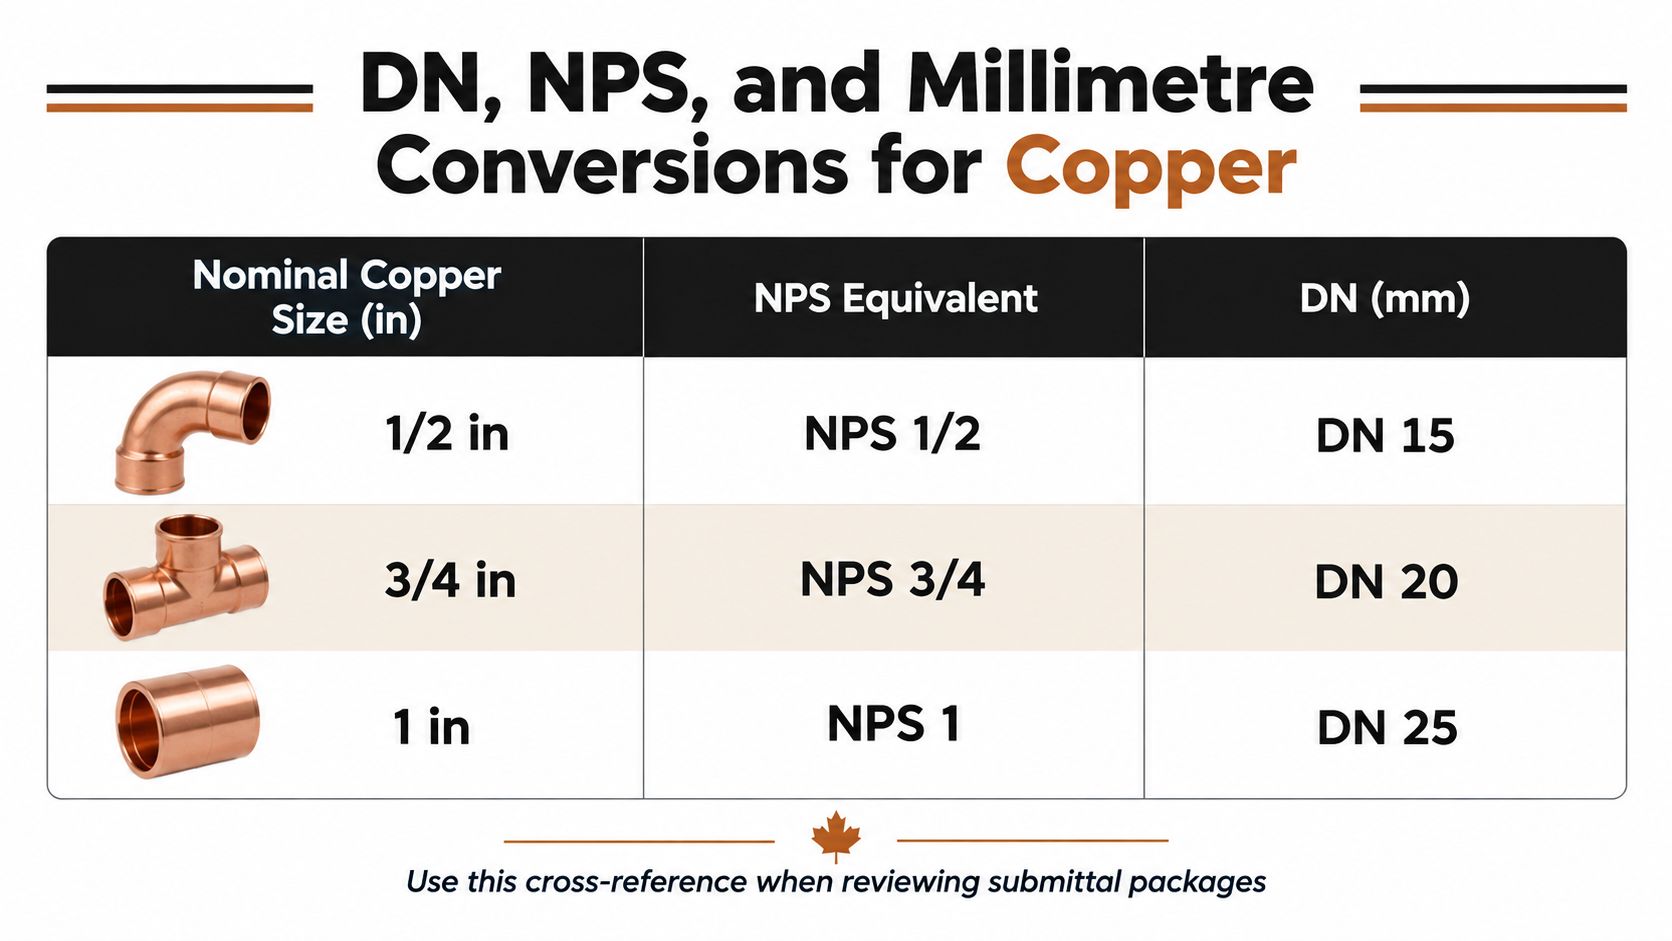
The National Plumbing Code of Canada NPS to DN conversion framework lists 1/2 inch as DN 15, 3/4 inch as DN 20, 1 inch as DN 25, 1-1/4 inch as DN 32, and 1-1/2 inch as DN 38. Keep those pairings together on drawings and purchase orders so a reviewer doesn't have to infer them.
The Conversions That Cause Trouble
Nominal copper
NPS
DN
1/2 in
1/2
DN 15
3/4 in
3/4
DN 20
1 in
1
DN 25
1-1/4 in
1-1/4
DN 32
1-1/2 in
1-1/2
DN 38
The last row deserves attention. Many people expect 1-1/2 inch to pair with DN 40 because the arithmetic looks tidy. The Canadian code framework uses DN 38, so a submittal review should flag the difference instead of "correcting" it to the rounder number.
Millimetre outside diameter is a separate column again. If a supplier quotes a true metric tube by measured OD, don't assume its DN label makes it interchangeable with a CTS tube of a similar nominal name. The fitting system has to match the actual tube OD and standard.
A DN label helps two documents refer to the same nominal product. It doesn't guarantee that two tubes from different sizing systems will enter the same fitting.
For multi-unit work, put three fields on every order. State the nominal inch size, the DN designation used by the adopted code, and the tube standard with type. When a meter or valve arrives with threaded ends, add the thread designation as a fourth field.
That discipline sounds administrative until a shutdown is booked and residents have notices on their doors. Then a missing CTS to thread adapter becomes the whole day's problem.
Sizing Copper for Branches and Suite Connections
A branch isn't sized because it looks like the one beside it. It's sized from expected peak demand, available pressure, developed length, fitting losses, elevation, and an acceptable velocity under the code edition adopted where the building sits. Nominal diameter is the output of that work, not the starting assumption.
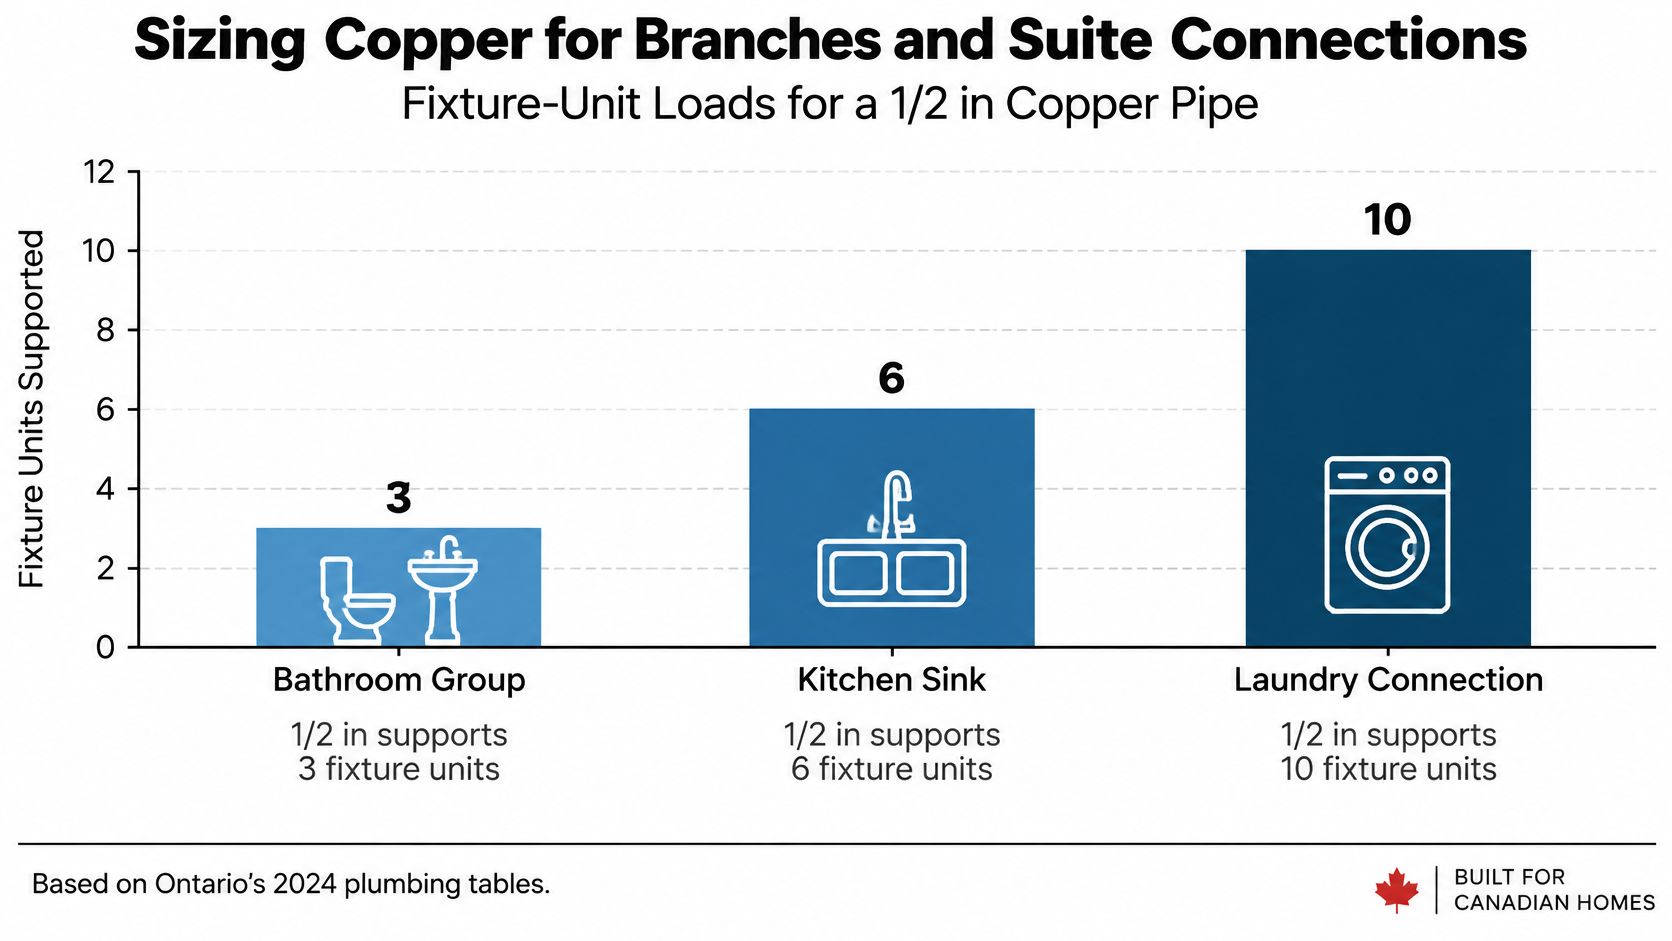
Ontario's approach shows why a single diameter can't carry a single fixture count. Under the Ontario 2024 plumbing tables for copper fixture units and velocity, a 1/2 inch copper pipe supports 4, 7, or 8 fixture units depending on whether design velocity is limited to 1.5, 2.4, or 3.0 m/s, a 3/4 inch pipe supports 9, 16, or 21 fixture units, and a 1 inch pipe supports 18, 31, or 43 fixture units. The same table logic also requires water service pipes to be sized for peak demand and generally not smaller than NPS 3/4, in that source.
Read that carefully. The diameter didn't change across each row. The permitted velocity did, and the allowable fixture load moved with it.
Work the Inputs in Order
Start with the fixtures served and their fixture unit values under the adopted code. Apply the code's diversity method for simultaneous demand rather than adding every fixture as though all of them will run at once. A suite branch, a stacked riser, and a main serving several floors don't peak in the same way.
Next, establish pressure at the take-off point and work through the run. Developed length is only part of the loss. Elbows, tees, valves, strainers, backflow components, and the meter itself add equivalent length or a manufacturer stated pressure drop.
Then account for elevation and temperature. A top floor branch has less pressure to spend than a lower floor branch fed from the same riser. Hot water brings a stricter velocity conversation than cold water, which the next sizing decision can't ignore.
- Fixture load: Count what's connected, using the adopted provincial or territorial method
- Peak demand: Size for the code's simultaneous demand estimate, not average daily use
- Residual pressure: Confirm enough pressure remains at the fixture after every loss in the branch
- Velocity: Check the chosen bore against the applicable hot or cold water limit
That final check is where a metering retrofit can turn marginal. A 3/4 inch Type L branch that performed acceptably with a straight run and one shutoff may not perform the same way after a meter, strainer, and two isolation valves are inserted. The tube didn't get smaller, but the pressure budget did.
This is also where meter selection and pipe sizing stop being separate purchases. The background in residential water meters and suite level selection is useful because the meter's approved operating range has to suit the branch's real demand, not just its nominal connection size.
Don't copy an existing diameter during a retrofit without asking what has changed. Added fixtures, altered recirculation, lower supply pressure, and new in-line components can all invalidate a size that once worked.
Why Bigger Is Not Always Safer in Copper
Oversizing feels conservative. In copper water distribution, it often isn't. A larger bore lowers velocity at a given flow, which can increase water residence time in branches that already see intermittent use. Long residence time supports stagnation, and stagnant sections are harder to keep in good condition than branches that turn over regularly.
Undersizing creates the opposite problem. Push the same demand through a smaller bore and velocity rises. Residents may hear noise, pressure fluctuates more sharply, and sustained high velocity can contribute to erosion corrosion, especially where direction changes and fittings disturb the flow.
Velocity Is a Temperature Question
Canadian guidance doesn't give one magic velocity for every copper run. Ontario's table uses 1.5, 2.4, and 3.0 m/s design columns for copper, as cited in the section above. British Columbia Housing cites Canadian Copper and Brass Development Association recommendations of 1.5 m/s for domestic cold water and 1.2 m/s for domestic hot water up to 60°C, in the guidance summarized by the National Plumbing Code of Canada 2025 corrosion and velocity reference. Watts likewise notes approximately 8 ft/s for cold water and 5 ft/s for hot water at 140°F, with recommended velocity falling to 2 to 3 ft/s above that temperature, in the same summary.
Those numbers aren't interchangeable design permissions. They come from different tables, applications, and temperature assumptions. The lesson is that "copper can handle it" is too vague to defend a diameter.
Sizing principle: Choose the smallest diameter that meets peak demand, residual pressure, and the applicable velocity limit. Don't choose the largest tube that fits in the wall.
Corrosion Starts on the Drawing
The 2025 national code discussion makes a point many diameter charts skip. Corrosion can result from poor system design or installation, including erosion corrosion, galvanic corrosion, and fatigue cracking, not from water chemistry alone. British Columbia Housing further reports that corrosive conditions can cause premature copper failures and identifies thicker Type K as more durable than Type L in vulnerable systems, as summarized in the source above.
That changes the remedy. If a hot water branch is failing at elbows, upsizing the whole run without checking velocity, temperature, recirculation balance, and dissimilar metal transitions may treat the symptom badly. A heavier wall may buy time, but it won't correct a layout that keeps attacking the tube.
Metering work adds local turbulence and new material interfaces at adapters, strainers, and valves. Keep those transitions deliberate, supported, and compatible. Bigger copper can't compensate for a poorly arranged assembly.
Matching Copper to a Water Meter Body
A meter body is selected by nominal connection size and flow range, not by sliding a caliper into its bore. A nominal 3/4 inch meter may connect through a copper tube end, a union, or a threaded adapter, depending on the manufacturer. The copper run and the meter ends have to be specified as one assembly.
Start by confirming what is already in the wall. Identify the ASTM standard, tube type, nominal size, orientation, and available straight length before you commit to a lay length. A meter that fits between two fittings on paper still needs room for unions, isolation, drainage, reading access, and future replacement.
The screenshot below shows how a submetering scope is typically presented before those field details are tied to a specific branch.

Build a Pressure Loss Budget
Every component in the metering assembly spends pressure. The meter has a loss across its operating range, and a strainer adds more as it collects debris. Isolation valves, checks or backflow components where required, reducers, and nearby elbows also belong in the calculation.
Check that total against the branch's residual pressure requirement at peak demand. If the margin disappears, options include selecting a meter with a suitable range and lower loss at expected flows, upsizing the local assembly where the design permits it, or revisiting the branch size. Don't solve it by removing a required strainer or valve and calling the assembly efficient.
Reducer placement matters too. Locate and support reducers in accordance with the meter manufacturer's installation instructions, with the required straight pipe or flow conditioning for that meter technology. A reducer jammed against the inlet can disturb the profile the meter expects, and a heavy assembly hanging from copper without support invites fatigue at the joints.
The selection principles in in-line water flow meter sizing and placement are relevant here because nominal connection size alone doesn't establish accuracy. Low flows at night, peak morning demand, and pressure loss all have to sit inside the meter's approved range.
Orientation, Temperature, and Service Access
Follow the flow arrow, then verify orientation against the manufacturer's permitted positions. Some assemblies tolerate vertical installation and others have restrictions that affect registration or servicing. A run that looks horizontal in a crowded ceiling may be pitched, trapped, or impossible to drain without wetting the suite below.
Separate cold and hot water requirements early. A hot water meter needs a body, seals, and electronics or register arrangement rated for that service, and the copper velocity check is stricter on the hot side. Don't let a single bulk order blur the two applications.
The short video below is a useful visual pause before finalizing an assembly, because lay length and access problems are easier to spot in three dimensions than in a parts list.
Support the finished assembly so valve operation doesn't twist the copper. Leave the strainer serviceable, the register readable, and isolation on both sides where the design calls for it. Most tenant side complaints after a retrofit trace back to pressure, noise, or a meter that never matched the branch, not to the nominal label.
Quick Reference and Selection Workflow
Use the same sequence on every suite, even when the building looks uniform from the corridor. Stacks get repaired over decades, and one altered branch can break a building wide assumption.
- Read the print line: Record the ASTM standard, type, nominal size, and temper where visible
- Measure outside diameter: Use a caliper to confirm the CTS nominal size instead of relying on an old tag
- Match the wall type: Specify K, L, or M deliberately, with the adopted code and service conditions in view
- Convert the designation: Add the correct DN pairing and identify every threaded end separately
- Size the branch: Check fixture units, peak demand, pressure loss, elevation, and velocity
- Select the meter assembly: Match connection, flow range, lay length, orientation, temperature rating, and support
Confirm the provincial or territorial code edition and any municipal requirements with the authority having jurisdiction before material is released. Fire suppression, medical gas, and boiler side work sit outside a general suite metering workflow and need their own design authority.
For Ontario projects, the jurisdictional context in water meter requirements in Ontario helps separate plumbing approval from the metering program around it. Keep the engineer of record in the decision where riser capacity, recirculation, or pressure is already marginal.
Cross-Reference Questions Readers Still Ask
Does the joining method change inside diameter? Solder, press, and push fit joints don't change the tube's own bore, but the fitting's internal geometry and any inserted component can affect local loss and turbulence. Check the assembly, not just the straight tube.
Can DWV copper replace water tube at the same nominal size? No. DWV tube under ASTM B306 is a drainage product, while pressure water distribution uses the applicable water tube standard and type. Same label, different job.
Why do refrigeration and medical gas tubes look similar? They're separate products with their own standards, cleanliness, certification, and sizing practices. Don't borrow a water tube chart for either one.
When is a reducer at a meter acceptable? When the engineer and meter manufacturer accept its location, the flow range still suits the branch, and the total pressure budget works. If velocity, accuracy, or residual pressure fails, the assembly or branch needs a fuller redesign.
If you're adding suite level water meters to a Canadian multi-unit building and the existing copper doesn't match the drawings, Axis Meter Solutions can survey the runs, align meter bodies to the actual tube type and branch demand, and deliver installation, commissioning, and tenant billing as one coordinated program. Visit Axis Meter Solutions to discuss your building before the next shutdown window is booked.
Ready to Optimize Your Utility Management?
Tell us about the property, utility, number of units, and your billing or monitoring goals. We'll help you identify the right next step.
Book a Call